Day 1: Java in Android
Activity Life Cycle
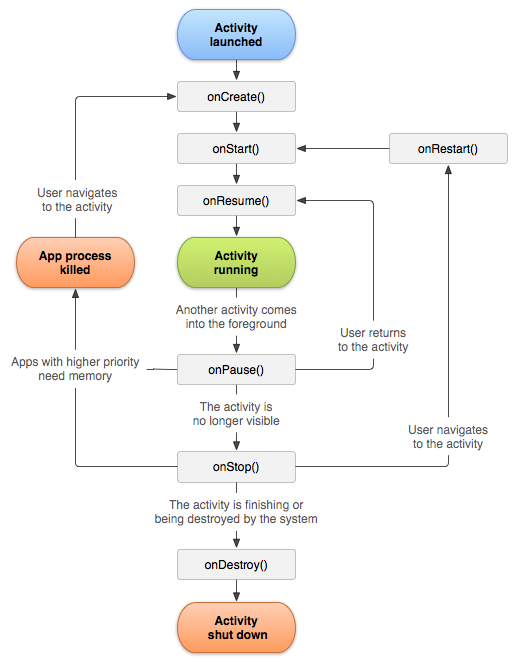
onCreate() is called when the system first creates the activity.
onStart() makes the activity visible to the user, as the app prepares for the activity for user interaction.
onResume() is the state in which app is interactable to the user.
onPause() indicates user leaving the activity, hence the activity not going to be in the foreground.
onStop() is invoked after the activity is no longer visible to the user.
onDestroy() is called before the activity is destroyed, after the completion of the event or from finish() being called
Debugging
Debugging is the practice of finding/resolving bugs in our Android app. Most of the time, it involves having to find out if certain blocks of code have been executed properly, or to check the values of some variables.
Using Log
Remember System.out.println() from our Day 0 Java Tutorial? In Android, we can use something similar, called Log to print out messages.
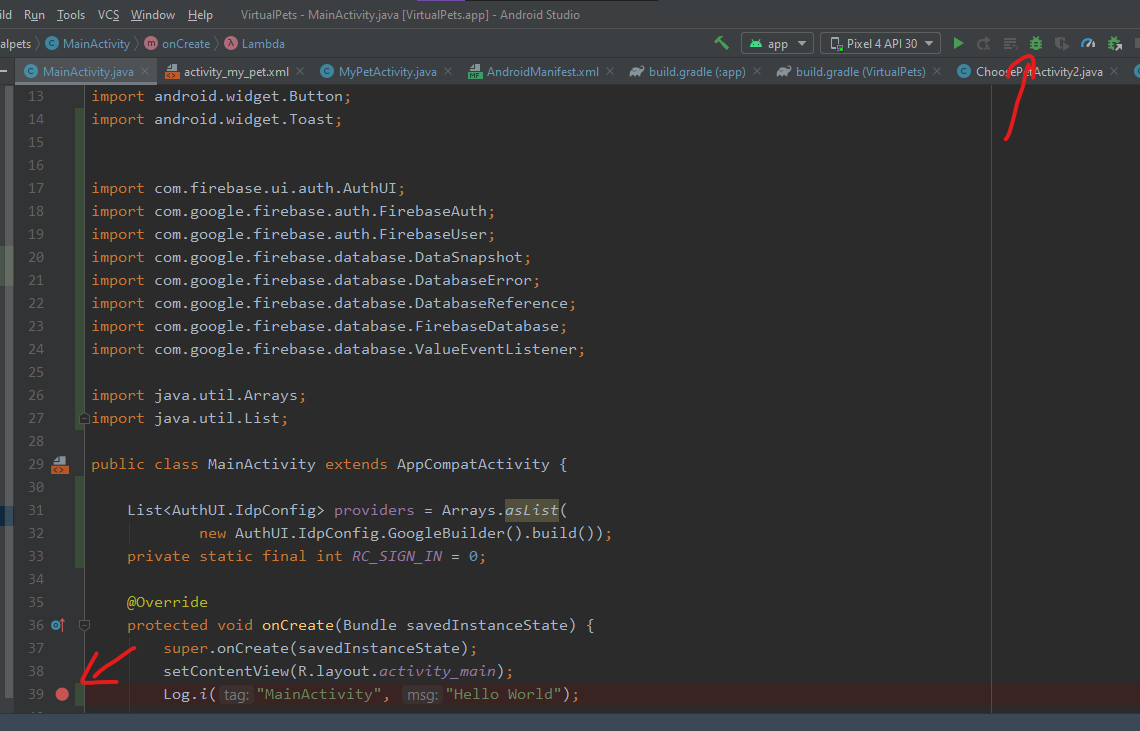
For example, in MainActivity.java, in the onCreate() function, write
Log.i("MainActivity", "Hello World");
Note: Log may appear red in your editor, which indicates an error. The error is because we need to import dependencies for
Log. Do that by placing your text cursor overLog, wait for a line to appear under it and pressAlt + Enteron your keyboard.
If you go to the bottom right of your Android Studio and look for Logcat, open it and run the app, you should be able to see see the following

Note that the Logcat at the bottom has filters that allows you to choose different devices, different processes and different log levels to show. Log.i prints INFO type messages. There are other functions like Log.d that prints DEBUG type messsages, and Log.e that prints ERROR type messages.
Using the Debugger
Android Studio gives you the capability to run the Android app is Debug mode. You are also able to set breakpoints in your code. In debug mode, Android Studio will cause a "pause" whenever you encounter these breakpoints, just before that line of code would be executed. You can choose to inspect the values of variables, or simply check that that part of the code is executed. After which, you can also choose to resume to program, or go through each subsequent line step-by-step.
To create a breakpoint at a line, you can click on the small space at the right side of the line number. A red circle will appear, indicating the breakpoint has been set.
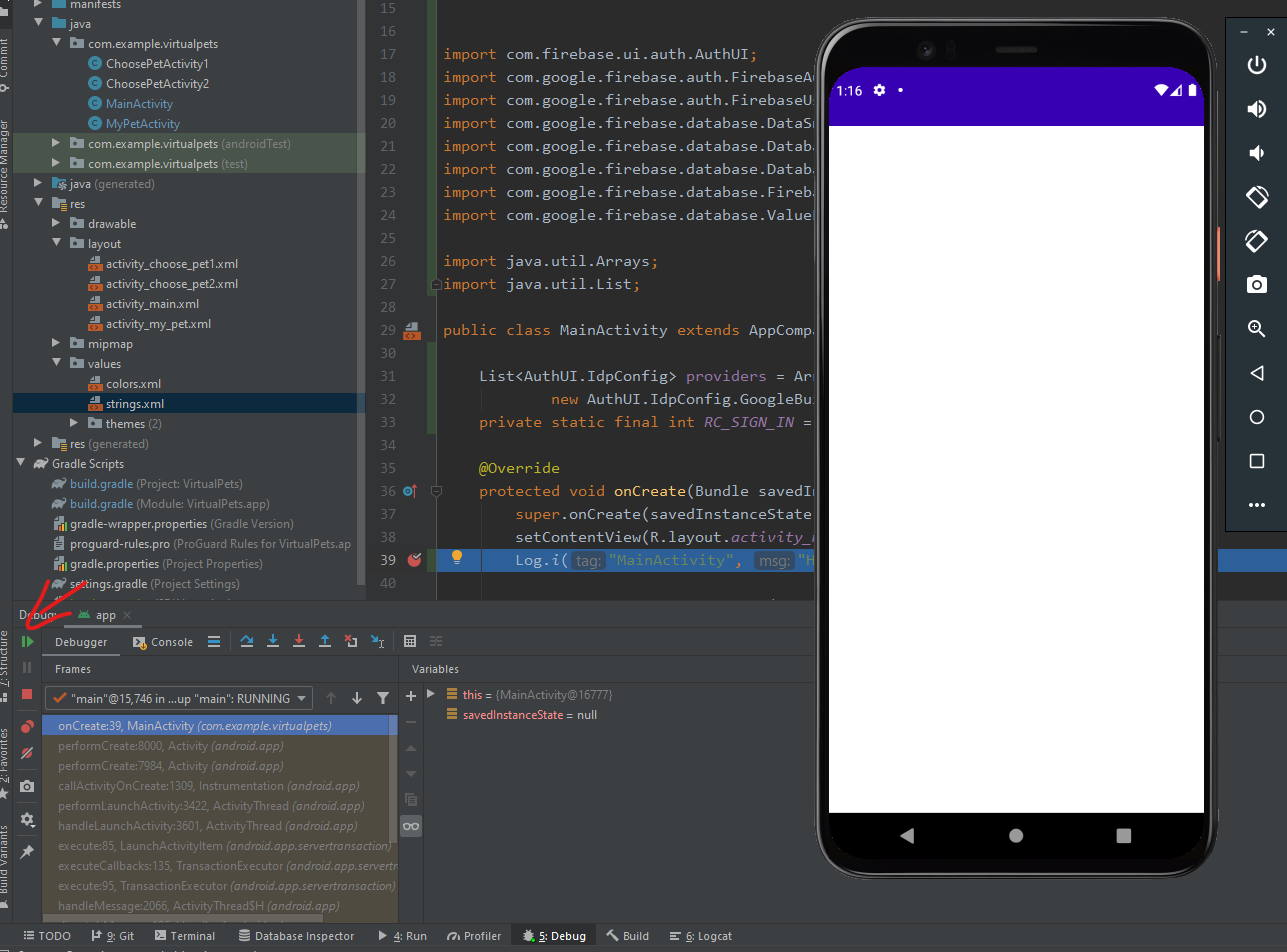
To run the program in debug mode, click on the green bug icon in your run bar at the top right
When you run the program, you should see the debug panel pop out at the bottom, where you can inspect the variables or choose to continue by clicking on the play button on the left.
Note: Debug mode tends to slow your program quite significantly, so you should only use it when you need it.
MainActivity.java
MainActivity will be our start screen. It will contain a start button that when pressed goes to the next activity.
Overriding onCreate()
First, we need to have the onCreate() method in the MainActivity class. We override it.
We add super.onCreate(savedInstanceState) so that the onCreate() of the parent class is run. (Should be auto-generated already)
package com.example.virtualpets;
import androidx.appcompat.app.AppCompatActivity;
import android.content.Intent;
import android.os.Bundle;
import android.view.View;
import android.widget.Button;
public class MainActivity extends AppCompatActivity {
    @Override
    protected void onCreate(Bundle savedInstanceState) {
        super.onCreate(savedInstanceState);
        });
    }
}
setContentView()
Next, we set the content view to the activity_main.xml created previously. This is done with the setContentView() method.
protected void onCreate(Bundle savedInstanceState) {
    super.onCreate(savedInstanceState);
    setContentView(R.layout.activity_main);
}
findViewById()
The activity_main.xml file contains a button with the id "startButton". To define the Button widget in our Java file, we need to instantiate(create) an Object of the Button class and assign the reference to the button. This can be done through the findViewById() method.
Do remember to import the Button by adding import android.widget.Button; to the top of the file.
protected void onCreate(Bundle savedInstanceState) {
    super.onCreate(savedInstanceState);
    setContentView(R.layout.activity_main);
    Button button = findViewById(R.id.startButton);
}
onClickListener
Now, we want to specify the action when the button is pressed. We use a click listener to do so. When the view that has been assigned an onClickListener is clicked, the corresponding onClick function will be called.
protected void onCreate(Bundle savedInstanceState) {
    super.onCreate(savedInstanceState);
    setContentView(R.layout.activity_main);
    Button button = findViewById(R.id.startButton);
    button.setOnClickListener(view -> {
            button.setText("Hello");
    });
}
Intents and startActivity()
An intent is an abstract description of an operation to be performed. When used with the startActivity() method, you can launch an activity. startActivity(Intent intent) is used to launch the activity. The intent passed into the startActivity() method is the description of the activity to start.
button.setOnClickListener(view -> {
        Intent intent = new Intent(MainActivity.this, ChoosePetActivity1.class);
        startActivity(intent);
});
This will allow us to start the next activity, which is ChoosePetActivity1.class. However, we observe that Android Studio highlights ChoosePetActivity1.class cannot be resolved. This is because we have not defined such a class. Proceed to create the class either by creating a new Java class in the Project File Tree, or alternatively, hover over the red highlighted ChoosePetActivity and use alt + shift + enter to create the class.
Final Code of MainActivity.java
package com.example.virtualpets;
import androidx.appcompat.app.AppCompatActivity;
import android.content.Intent;
import android.os.Bundle;
import android.view.View;
import android.widget.Button;
public class MainActivity extends AppCompatActivity {
    @Override
    protected void onCreate(Bundle savedInstanceState) {
        super.onCreate(savedInstanceState);
        setContentView(R.layout.activity_main);
        Button button = findViewById(R.id.startButton);
        button.setOnClickListener(new View.OnClickListener() {
            @Override
            public void onClick(View view) {
                Intent intent = new Intent(MainActivity.this, ChoosePetActivity1.class);
                startActivity(intent);
            }
        });
    }
}
ChoosePetActivity1
ChoosePetActivity1 is an activity for the user to select their first pet. It will contain 3 different images, each indicating a pet. When clicked, the first pet will be set to the corresponding pet. Selecting a pet will go to the next activity.
setContentView()
Similar to what we did in MainActivity, use setContentView() to set the activity content to the corresponding xml file. (The code is usually generated for you already)
public class ChoosePetActivity1 extends AppCompatActivity {
    @Override
    protected void onCreate(Bundle savedInstanceState) {
        super.onCreate(savedInstanceState);
        setContentView(R.layout.activity_choose_pet1);
        }
}
ImageView and findViewById()
Define the 3 images in our xml by using findViewById(). Start by importing ImageView. Add import android.widget.ImageView; to the top of the Java file. Next, instantiate the ImageViews and assign the corresponding image to them.
    @Override
    protected void onCreate(Bundle savedInstanceState) {
        super.onCreate(savedInstanceState);
        setContentView(R.layout.activity_choose_pet1);
                ImageView catImage = findViewById(R.id.catImage);
        ImageView dogImage = findViewById(R.id.dogImage);
        ImageView fishImage = findViewById(R.id.fishImage);
        }
SharedPreferences
SharedPreferences is used to access and modify preference data. For any particular set of preferences, all clients share a single instance of the class. This allow usage of SharedPreference to save key-value data for the application. However, this is only reccomended for a relatively small collection of data. SharedPreferences uses expensive operations which may slow down an application, especially when frequently changed.
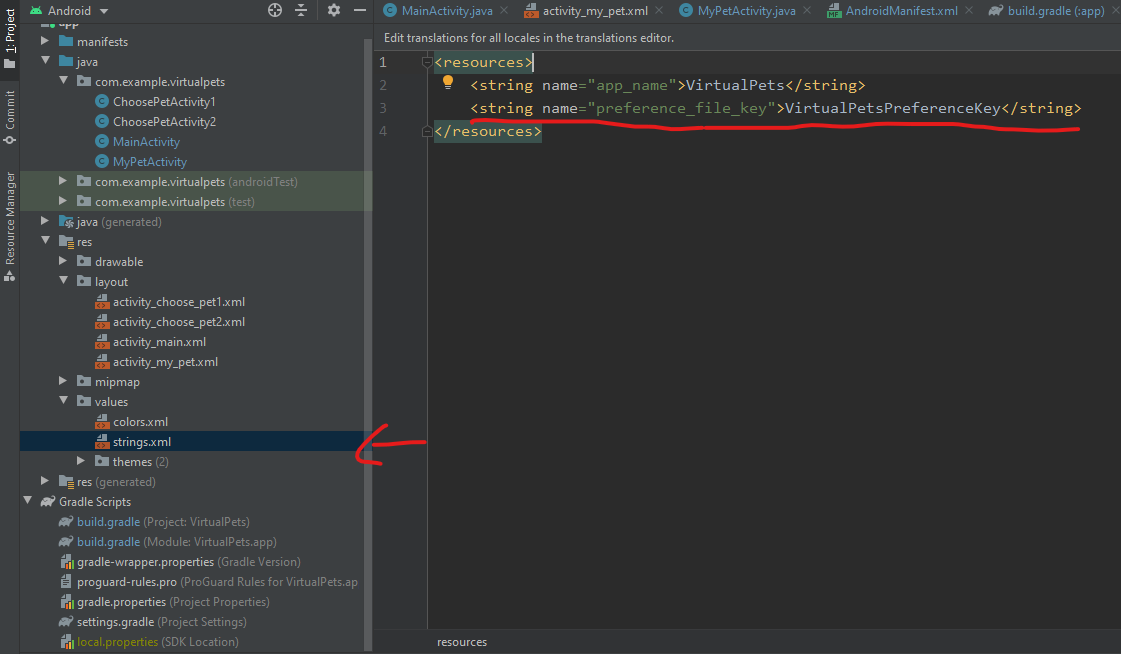
Under res/values/strings.xml, add a preference_file_key. The name refers to the key or tag you are giving to this string. The VirtualPetsPreferenceKey is the actual string value itself.
<resources>
    ...
    <string name="preference_file_key">VirtualPetsPreferenceKey</string>
</resources>
Here is how it should look after that
Navigate back to the ChoosePetActivity1.java file.
Start by importing SharedPreferences using import android.content.SharedPreferences;
Get a reference to our SharedPreferences file by using getSharedPreferences.
Note that the above getString(R.string.preference_key_file) gets a string from strings.xml. This string will help us to determine which SharedPreference file we are using. We will be access this same SharedPreference file in the future as well.
@Override
protected void onCreate(Bundle savedInstanceState) {
    super.onCreate(savedInstanceState);
    setContentView(R.layout.activity_choose_pet1);
    ImageView catImage = findViewById(R.id.catImage);
    ImageView dogImage = findViewById(R.id.dogImage);
    ImageView fishImage = findViewById(R.id.fishImage);
    SharedPreferences sharedPref = getSharedPreferences(getString(R.string.preferences_file_key), Context.MODE_PRIVATE);
}
To edit a key value pair, use the following method
sharedPref.edit().putString("key","value").apply();
To access a key value pair, use the following method
sharedPref.getString("key","default_value");
NOTE: This
sharedPref.getString()is different from thegetString()we used above!!!sharedPref.getString()gets a string from our SharedPreference file, whilegetString()gets a string from ourstrings.xml
We will take a look at accessing and editing key value pairs in shared preferences a bit later.
setOnClickListener()
Like the button earlier, we will set onclick listeners for each image.
@Override
    protected void onCreate(Bundle savedInstanceState) {
        super.onCreate(savedInstanceState);
        setContentView(R.layout.activity_choose_pet1);
        ImageView catImage = findViewById(R.id.catImage);
        ImageView dogImage = findViewById(R.id.dogImage);
        ImageView fishImage = findViewById(R.id.fishImage);
        SharedPreferences sharedPref = getSharedPreferences(getString(R.string.preference_file_key), Context.MODE_PRIVATE);
        catImage.setOnClickListener(view -> {
            //catImage onclick function goes here
        });
        dogImage.setOnClickListener(view -> {
            //dogImage onclick function goes here
        });
        fishImage.setOnClickListener(view -> {
            //fishImage onclick function goes here
        });
    }
We want each image to store a key value pair corresponding to which image is clicked.
As mentioned above, we use sharedPref.edit().putString("key","value").apply();
After storing the key value pair, we want to proceed to start the next activity to be launched. For convenience sake, we will create a method for it.
protected void onCreate(Butndle savedInstanceState) {
    // code not shown
}
private void goNextActivity() {
    Intent intent = new Intent(this, ChoosePetActivity2.class);
    startActivity(intent);
}
Hence, our setOnClickListener() would look first edit the shared preference to store the key value pair for pet choice, and then execute the method goNextActivity().
catImage.setOnClickListener(view -> {
    sharedPref.edit().putString("pet1", "cat").apply();
    goNextActivity();
});
dogImage.setOnClickListener(view -> {
    sharedPref.edit().putString("pet1", "dog").apply();
    goNextActivity();
});
fishImage.setOnClickListener(view -> {
    sharedPref.edit().putString("pet1", "fish").apply();
    goNextActivity();
});
Final code for ChoosePetsActivity1.java looks like this
package com.example.virtualpets;
import androidx.appcompat.app.AppCompatActivity;
import android.content.Context;
import android.content.Intent;
import android.content.SharedPreferences;
import android.os.Bundle;
import android.view.View;
import android.widget.ImageView;
public class ChoosePetActivity1 extends AppCompatActivity {
    @Override
    protected void onCreate(Bundle savedInstanceState) {
        super.onCreate(savedInstanceState);
        setContentView(R.layout.activity_choose_pet1);
        // Set references to Images
        ImageView catImage = findViewById(R.id.catImage);
        ImageView dogImage = findViewById(R.id.dogImage);
        ImageView fishImage = findViewById(R.id.fishImage);
        // Get a reference to SharedPreferences
        SharedPreferences sharedPref = getSharedPreferences(getString(R.string.preference_file_key), Context.MODE_PRIVATE);
        catImage.setOnClickListener(view -> {
            sharedPref.edit().putString("pet1", "cat").apply();
            goNextActivity();
        });
        dogImage.setOnClickListener(view -> {
            sharedPref.edit().putString("pet1", "dog").apply();
            goNextActivity();
        });
        fishImage.setOnClickListener(view -> {
            sharedPref.edit().putString("pet1", "fish").apply();
            goNextActivity();
        });
    }
    private void goNextActivity() {
        Intent intent = new Intent(this, ChoosePetActivity2.class);
        startActivity(intent);
    }
}
ChoosePetActivity2
ChoosePetActivity2 allows the user to select their 2nd pet. After selecting the 2nd pet, the app will go to the next activity.
ChoosePetActivity2 is largely the same as ChoosePetActivity1.
There are just 2 small changes to be made.
Firstly, change pet1 to pet2.
Next, modify goNextActivity() to start MyPetActivity instead.
private void goNextActivity() {
    Intent intent = new Intent(this, MyPetActivity.class);
    startActivity(intent);
}
Final code for ChoosePetActivity2
package com.example.virtualpets;
import androidx.appcompat.app.AppCompatActivity;
import android.content.Context;
import android.content.Intent;
import android.content.SharedPreferences;
import android.os.Bundle;
import android.widget.ImageView;
public class ChoosePetActivity2 extends AppCompatActivity {
    @Override
    protected void onCreate(Bundle savedInstanceState) {
        super.onCreate(savedInstanceState);
        setContentView(R.layout.activity_choose_pet2);
        // Set references to Images
        ImageView catImage = findViewById(R.id.catImage);
        ImageView dogImage = findViewById(R.id.dogImage);
        ImageView fishImage = findViewById(R.id.fishImage);
        // Get a reference to SharedPreferences
        SharedPreferences sharedPref = getSharedPreferences(getString(R.string.preference_file_key), Context.MODE_PRIVATE);
        catImage.setOnClickListener(view -> {
            sharedPref.edit().putString("pet2", "cat").apply();
            goNextActivity();
        });
        dogImage.setOnClickListener(view -> {
            sharedPref.edit().putString("pet2", "dog").apply();
            goNextActivity();
        });
        fishImage.setOnClickListener(view -> {
            sharedPref.edit().putString("pet2", "fish").apply();
            goNextActivity();
        });
    }
    private void goNextActivity() {
        Intent intent = new Intent(this, MyPetActivity.class);
        startActivity(intent);
    }
}
MyPetActivity
MyPetActivity is the activity for the management for the pets. It will list each pet, and allow the user to feed each pet, and change the pet's hunger level accordingly.
onCreate() and setContentView()
Similarly, we need override onCreate() method and set content view to the corresponding xml file. (This code should already be there)
public class MyPetActivity extends AppCompatActivity {
    @Override
    protected void onCreate(Bundle savedInstanceState) {
        super.onCreate(savedInstanceState);
        setContentView(R.layout.activity_my_pet);
    }
}
findViewById()
Similar to the previous files, get reference to all the views in the xml.
Do remember to import Button, ImageView and TextView.
@Override
protected void onCreate(Bundle savedInstanceState) {
    super.onCreate(savedInstanceState);
    setContentView(R.layout.activity_my_pet);
    ImageView pet1Image = findViewById(R.id.pet1Image);
    TextView pet1HungerText = findViewById(R.id.pet1HungerText);
    Button pet1Button = findViewById(R.id.pet1Button);
    ImageView pet2Image = findViewById(R.id.pet2Image);
    TextView pet2HungerText = findViewById(R.id.pet2HungerText);
    Button pet2Button = findViewById(R.id.pet2Button);
}
sharedPreferences and getString()
First, get a copy of the Shared Preferences.
SharedPreferences sharedPref = getSharedPreferences(getString(R.string.preference_file_key), Context.MODE_PRIVATE);
Next, get the values for pet1 and pet2 from Shared Preferences using getString method. We can set the default value of pet1 to be cat and pet2 to be dog.
The getString() is used to retrieve a String value from the preferences.
getString(String key, String defValue) retrieves the String value with the corresponding key from Shared Preferences. If the preference does not exist, the defValue is returned instead.
@Override
protected void onCreate(Bundle savedInstanceState) {
    super.onCreate(savedInstanceState);
    setContentView(R.layout.activity_my_pet);
    ImageView pet1Image = findViewById(R.id.pet1Image);
    TextView pet1HungerText = findViewById(R.id.pet1HungerText);
    Button pet1Button = findViewById(R.id.pet1Button);
    ImageView pet2Image = findViewById(R.id.pet2Image);
    TextView pet2HungerText = findViewById(R.id.pet2HungerText);
    Button pet2Button = findViewById(R.id.pet2Button);
    SharedPreferences sharedPref = getSharedPreferences(getString(R.string.preference_file_key), Context.MODE_PRIVATE);
    String pet1 = sharedPref.getString("pet1","cat");
    String pet2 = sharedPref.getString("pet2","dog");
}
initializeWidgetForPet()
Since each pet has the same behavior, we can use a function to avoid unnecessary repetition of the code.
initializeWidgetForPet() will do 3 things.
1) Display the corresponding image for the selected pet
2) Initialize the hunger level of each pet
3) set an onClick listener for the button to increase hunger level by 1 for the pet when clicked.
Start by defining the method initializeWidgetForPet()
private void initialiseWidgetsForPet(ImageView petImage, TextView hungerText, Button petButton, String pet) {
    // Code goes here
}
setImageResource()
We can just check the type of pet using the input String "pet".
We can then use setImageResource() to display the corresponding image for each pet.
private void initialiseWidgetsForPet(ImageView petImage, TextView hungerText, Button petButton, String pet) {
    if (pet.equals("cat")) {
        petImage.setImageResource(R.drawable.cat);
    } else if (pet.equals("dog")) {
        petImage.setImageResource(R.drawable.dog);
    } else {
        petImage.setImageResource(R.drawable.fish);
    }
}
Initialize Hunger Value
The hunger value is stored as the String value in the text of the hungerText TextView. Using setText(), we can initalize the value to 100.
private void initialiseWidgetsForPet(ImageView petImage, TextView hungerText, Button petButton, String pet) {
    if (pet.equals("cat")) {
        petImage.setImageResource(R.drawable.cat);
    } else if (pet.equals("dog")) {
        petImage.setImageResource(R.drawable.dog);
    } else {
        petImage.setImageResource(R.drawable.fish);
    }
    hungerText.setText(Integer.toString(100));
}
setOnClickListener()
The petButton gets the Integer of the hunger level from the hungerText TextView, increments it by 1 and sets the text value of the hungerText TextView to the new value.
private void initialiseWidgetsForPet(ImageView petImage, TextView hungerText, Button petButton, String pet) {
    if (pet.equals("cat")) {
        petImage.setImageResource(R.drawable.cat);
    } else if (pet.equals("dog")) {
        petImage.setImageResource(R.drawable.dog);
    } else {
        petImage.setImageResource(R.drawable.fish);
    }
    hungerText.setText(Integer.toString(100));
    petButton.setOnClickListener(view -> {
        int oldHunger = Integer.parseInt(hungerText.getText().toString());
        hungerText.setText(Integer.toString(oldHunger + 1));
    });
}
Final code for MyPetActivity.java
package com.example.virtualpets;
import androidx.appcompat.app.AppCompatActivity;
import android.content.Context;
import android.content.SharedPreferences;
import android.os.Bundle;
import android.widget.Button;
import android.widget.ImageView;
import android.widget.TextView;
public class MyPetActivity extends AppCompatActivity {
    @Override
    protected void onCreate(Bundle savedInstanceState) {
        super.onCreate(savedInstanceState);
        setContentView(R.layout.activity_my_pet);
        // Set references to widgets in layout file
        ImageView pet1Image = findViewById(R.id.pet1Image);
        TextView pet1HungerText = findViewById(R.id.pet1HungerText);
        Button pet1Button = findViewById(R.id.pet1Button);
        ImageView pet2Image = findViewById(R.id.pet2Image);
        TextView pet2HungerText = findViewById(R.id.pet2HungerText);
        Button pet2Button = findViewById(R.id.pet2Button);
        // Get copy of sharedpreferences
        SharedPreferences sharedPref = getSharedPreferences(getString(R.string.preference_file_key), Context.MODE_PRIVATE);
        // Get Pet1, default to cat
        String pet1 = sharedPref.getString("pet1", "cat");
        // Get Pet2, default to dog
        String pet2 = sharedPref.getString("pet2", "dog");
        initialiseWidgetsForPet(pet1Image, pet1HungerText, pet1Button, pet1);
        initialiseWidgetsForPet(pet2Image, pet2HungerText, pet2Button, pet2);
    }
    private void initialiseWidgetsForPet(ImageView petImage, TextView hungerText,
                                         Button petButton, String pet) {
        // This function runs for each pet we have
        // Set the image based on which pet it is
        if (pet.equals("cat")) {
            petImage.setImageResource(R.drawable.cat);
        } else if (pet.equals("dog")) {
            petImage.setImageResource(R.drawable.dog);
        } else {    // Else it probably is a fish
            petImage.setImageResource(R.drawable.fish);
        }
        // Set the hungerText to 100 at first
        hungerText.setText(Integer.toString(100));
        // Set onclicklistener to increment hunger by 1 for each button click
        petButton.setOnClickListener(view -> {
            int oldHunger = Integer.parseInt(hungerText.getText().toString());
            hungerText.setText(Integer.toString(oldHunger + 1));
        });
    }
}